How to Create a Facebook Business Page in 6 Easy Steps
Learn how to create a Facebook Business Page in 6 simple steps and startgrowing your brand online with ease.
Kasthuri | 16 May 2024

Facebook is an online social media platform used by millions of people every day. This makes it perfect for creating a better corporate image, getting more customers, and standing out from your competition online. It helps you connect with customers, provide quick responses, target your audience, and use Facebook ads to promote your business.
Facebook has three billion monthly active users, making it the largest social network in the world. If you’re not using it to communicate with your customers, you’re missing out. It’s tough love, but you have to deal with it!
What is a Facebook business page?
Social media is very popular, and will stay that way for a long time. If your small business isn’t using Facebook yet, you might want to consider getting started. A Facebook business page is a great place to:
- Promote events
- Share content
- Create posts
- Communicate with clients
- Share business news
- Share updates
Why Do You Need a Facebook Business Page?
Having a Facebook account for your business can bring many benefits to your online presence and sales. According to Facebook, with over 200 million companies using Facebook tools 1.82 billion times a day, they use Facebook tools to communicate with their customers.
The platform is particularly useful for entrepreneurs with small and medium-sized businesses, both locally and internationally. You can use the tools available for your business for free, without having to pay a monthly fee to create your business page.
Once your new page is ready to go public, you can plan your advertising and future digital marketing.
Creating Facebook Business Page in 6 Steps
1. Create/Sign Up for Your Facebook Business Page
- Log in to Facebook.
- Select the Pages tab from the left-hand sidebar.
- Click the green Create Page button in the upper right-hand corner.
- Click Get Started under “Business or Brand” or “Community or Public Figure,” depending on your organization type.
- Most business owners will choose the Business or Brand category to market their products, services, and overall brand.
- Invite friends and family to follow your new page.
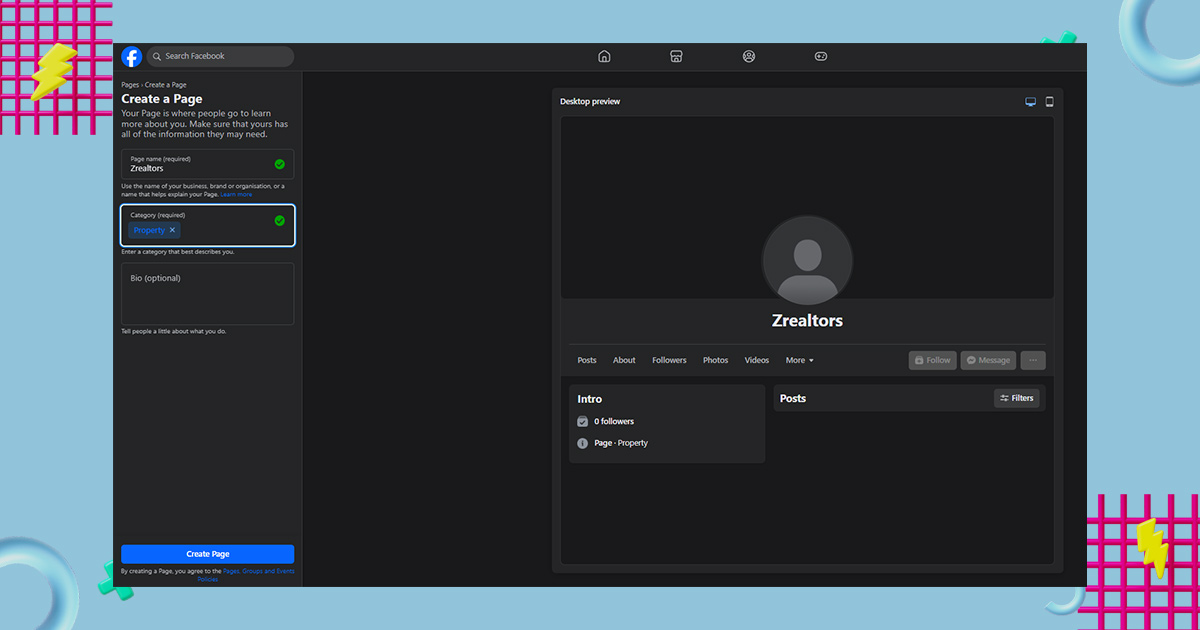
Log in to the selected account, then click the Create a Page link or go to the Pages menu using your Facebook account.
Once you’re on the pages menu, tap “Create new page.”
2. Enter your business details
Next, you’ll set up your business profile. The more information you provide, the more helpful your Facebook business page will be to potential customers.
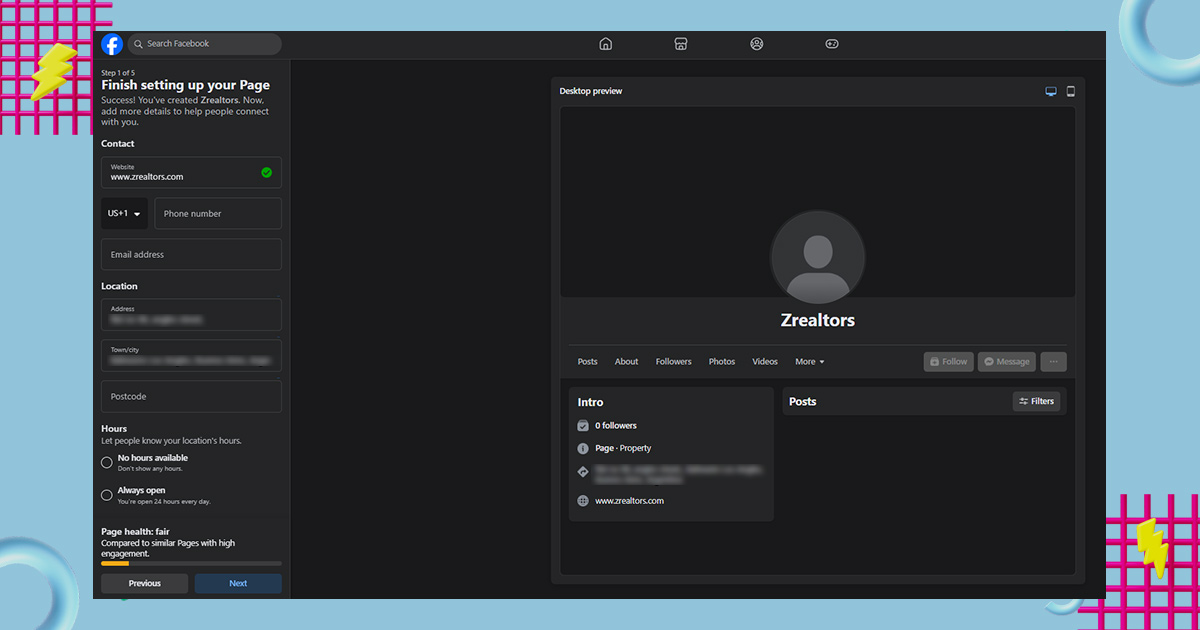
- Page Name: Enter your business name as your back name.
- Business category: Choose a specific category that best describes what your business does (e.g., “car repair”). If no specific category is used, something as generic as “business work” can do the trick.
- Business Address: Fill in your business address. You can choose Don’t show my address if you only want your city and state to be displayed, which is useful if your office is in your home or you don’t allow visitors
- Contact Information: Include your phone number, other relevant contact information and business hours.
- Create Page @Username: Under your page name in the left pane, tap Create Page @Username. This unique name will give you your preferred URL (e.g. facebook.com/username) and help potential customers find you. It’s best to use your company’s exact name whenever possible.
3. Add visuals for business facebook page
Follow the instructions provided to add your profile photo and cover image. Your profile picture should be your brand logo because it helps with brand awareness. Consider using photos of your employees providing services or showcasing your products for Facebook cover photos.
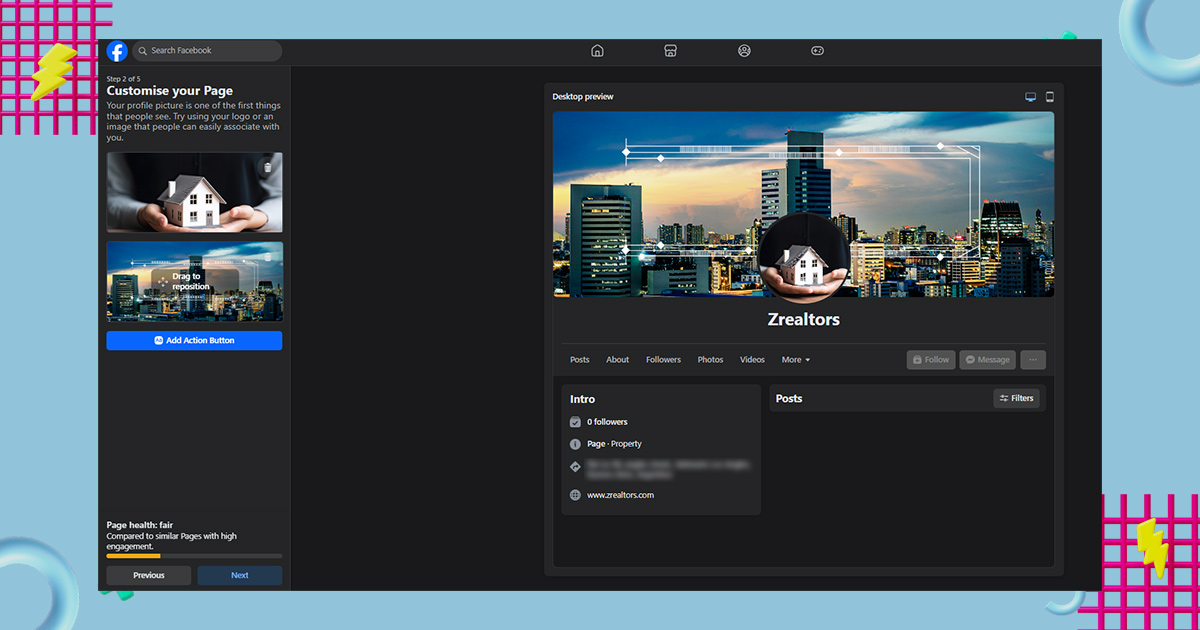
You can skip these steps or change them later, but adding these images will make your work look more legitimate.
4. Create an Action Button (Call-to-Action)
Follow these steps to set up a call-to-action (CTA) button on your Facebook Business Page:
- Go to your Facebook Business Page and click the blue “+ Add a Button” button below your cover photo.
- Select the CTA type you want to use from the selection list, such as “Shop Now”, “Book Now,” or “Contact Us”.
- Click the button and enter the URL you want people to go to. This could be a product page on your website or a contact form.
- Click “Finish” to save your changes.
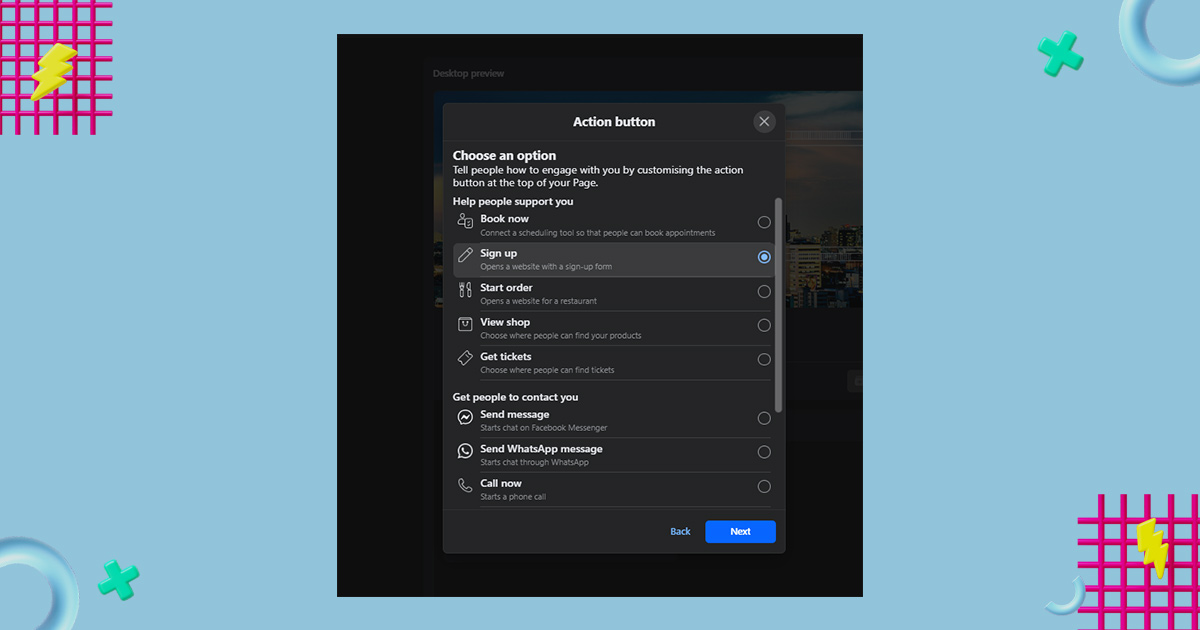
Pro Tip: Remember to regularly review and update your CTA based on your business goals and any progress you’re making.
5. Connect Business Facebook Page with your WhatsApp Business
Link your Facebook Business Page with your WhatsApp Business account to make it easier for customers to interact with you. Here’s how to do it:
- Go to your Facebook Page and click on “Settings” in the top right corner.
- Click on “WhatsApp” in the left menu.
- Click “Connect Account”.
- Enter your WhatsApp Business phone number and click on “Send Code”.
- Verify your phone number by entering the verification code you received through WhatsApp.
- Once confirmed, select the types of messages you want to send from your Facebook Page to WhatsApp (e.g. customer service inquiries, order updates).
- Click “Finish” to save your settings.
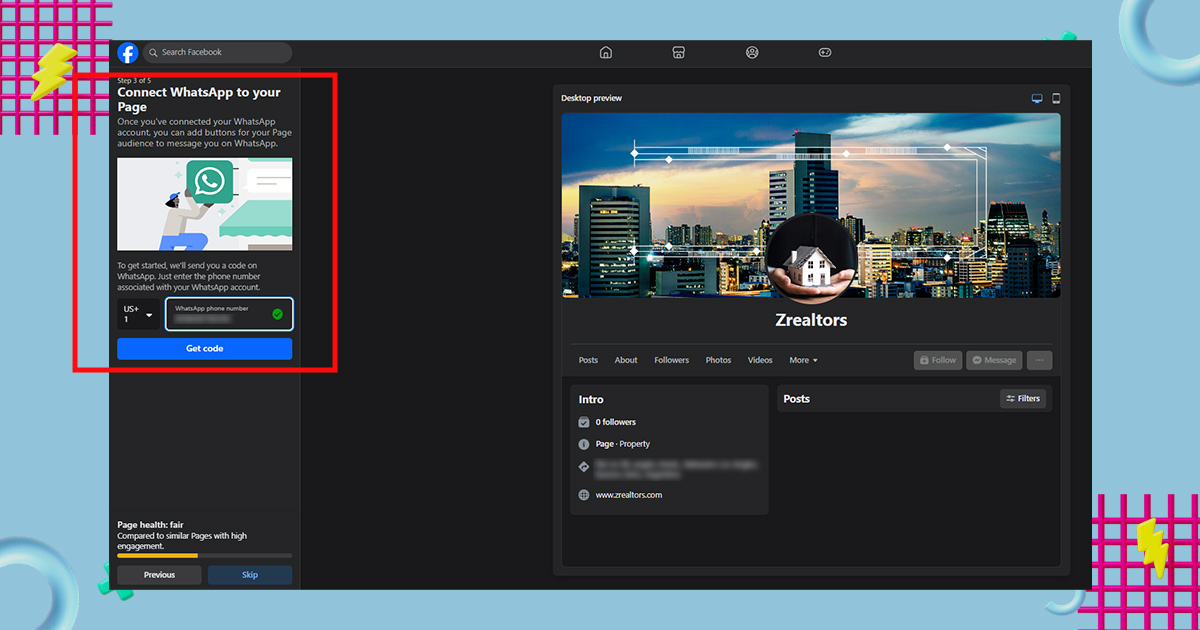
Once your business page is linked to your WhatsApp Business account, customers can click the “Message” button on your business page to send a WhatsApp message directly to them.
6. Create a First Post
It may seem daunting to start your first post on your new page, but it’s a big deal to get started online. Here are some tips to help:
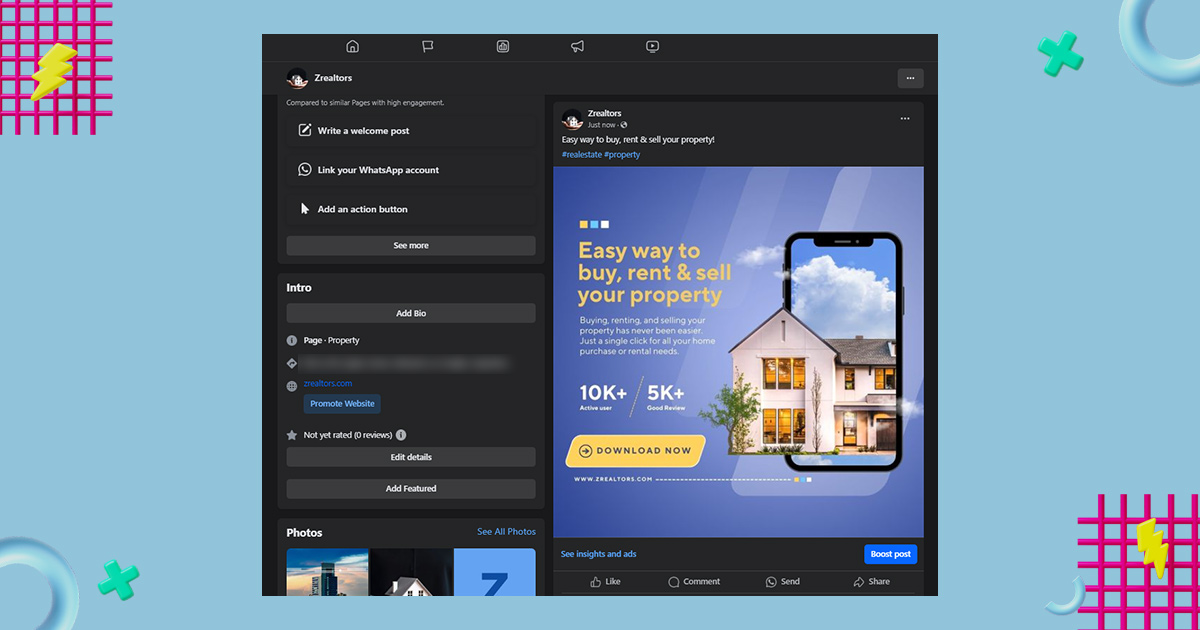
- Define your audience: Think about who will see your posts and what they might be interested in.
- Keep it short: People don’t like reading long posts on social media, so keep it short and easy to understand.
- Use photos and videos: It makes your posts more interesting. Use the best that fits what you are saying. You can try Canva for free templates.
- Showcase your brand personality: Show your personality in what you write. That’s what people want.
- Include a call-to-action (CTA): Ask people to comment or share their thoughts at the end of your post.
How to Manage a Facebook Business Page
So now you’ve got a business Facebook page—congratulations! Now, let’s talk about how to manage that FB page.
How to Deactivate Your Facebook Page Temporarily
Do you want to take a break from your Facebook page or save it for a while? If you think you might want it back later, you can temporarily disable it. Here’s how:
- Go to your Facebook Page and click on ‘Settings’ in the top right corner.
- Click ‘General’ on the left.
- Scroll down and click ‘Remove Page’.
- Select ‘Deactivate Page’ and click ‘Continue’.
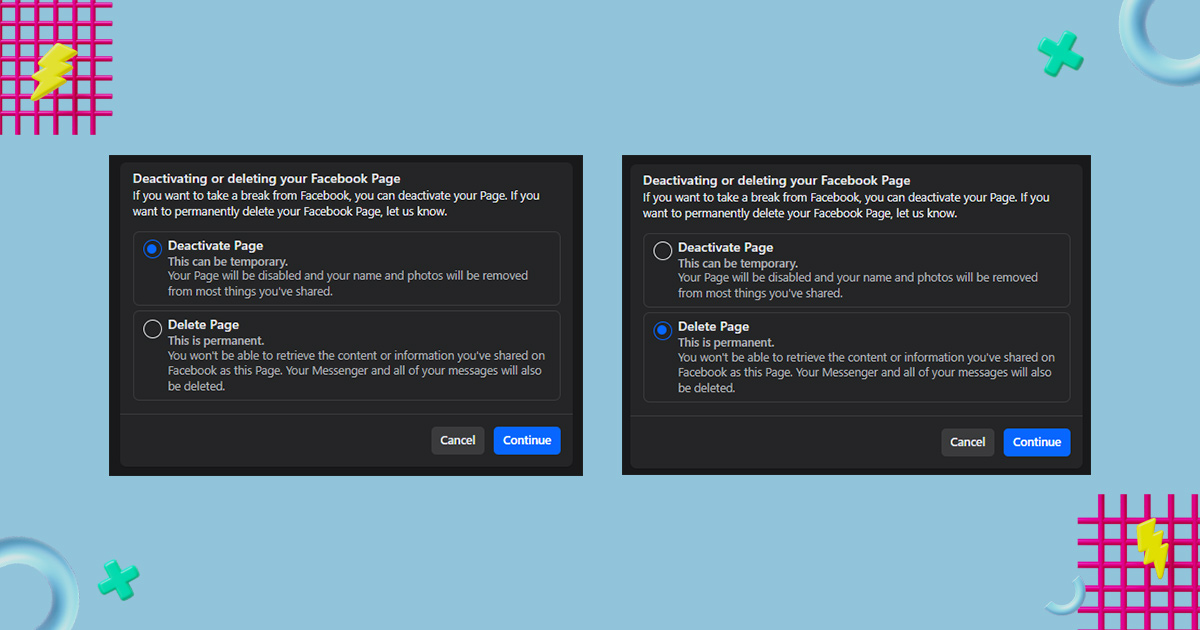
Follow the instructions to validate. Once you do this, no one can see your back. Remember that deactivation is different from deletion. Deletion means losing everything, so make sure you’re sensitive to your choices.
How to delete a Facebook Page
If you close your business or just want to permanently remove your Facebook page, you can permanently delete it. Here’s how to do it:
- Go to your Facebook Page and click on ‘Settings’ in the top right corner.
- Click ‘General’ on the left.
- Scroll down and click ‘Remove Page’.
- Select ‘Permanently Delete Page’ and click ‘Continue’.
- Follow the instructions to validate. Once you do this, your page and all its content will be gone forever. You can’t fix this, so make sure it’s exactly what you want.
How to Schedule Posts
Posting on Facebook regularly is important, but it can be hard to keep up. Luckily, you can schedule posts ahead of time. Here’s how:
- Post yours as you normally would, with text, images, or links.
- When you are ready, click ‘Schedule’.
- Select the desired date and time.
- Click ‘Schedule’ again to set. That’s it! Your post will appear when you choose, you don’t have to do anything.
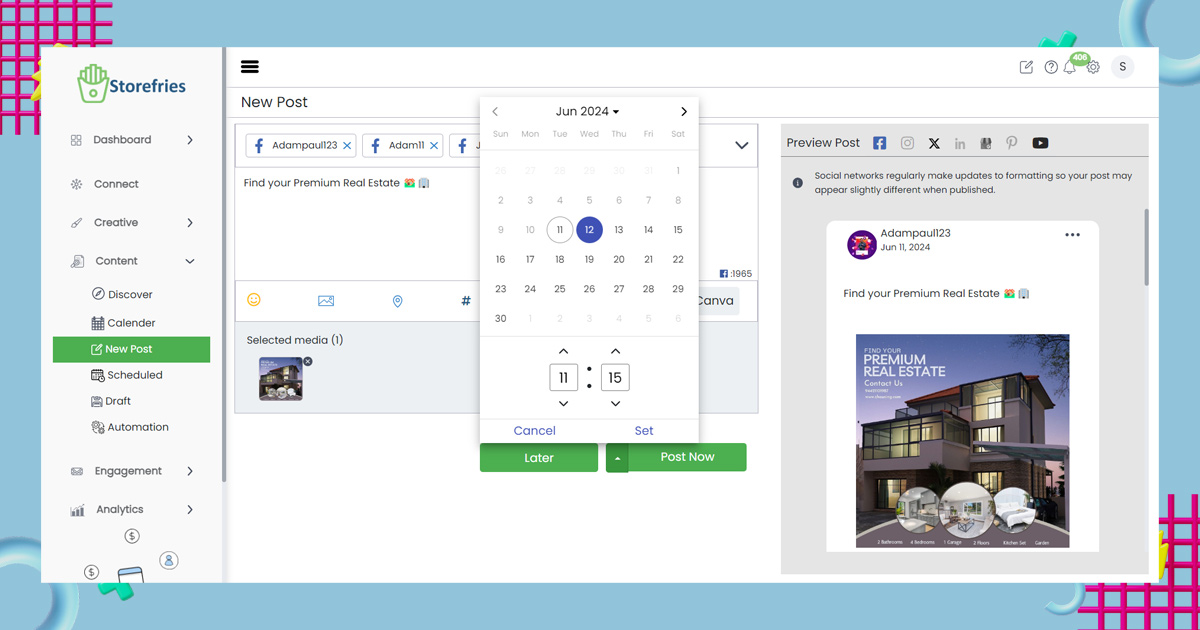
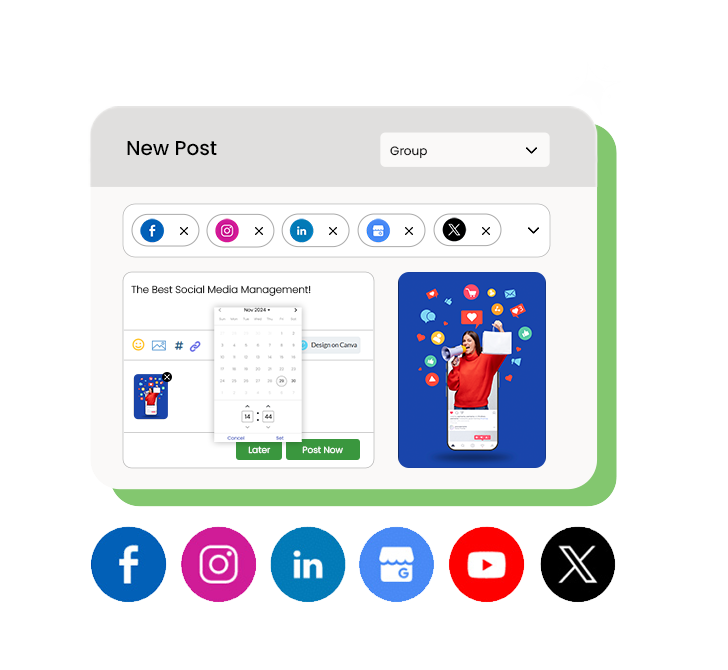
Another option is to use a scheduling tool like Storefries. This is a good route if you want to schedule posts for multiple platforms rather than just Facebook.
Are Personal Accounts Required to Create a Business Facebook Page?
Creating a Facebook business page usually requires you to use your own Facebook profile. But if you want to use your own account
To create a Facebook page without a personal Facebook account, create a new account on Facebook’s homepage with your business email address. This way, you’ll only need to provide first name, last name, Date of Birth and Gender.
Even if prompted, you are not required to add your phone number to Facebook. However, it can add an extra layer of security to your Facebook page. We’ll soon explain how to keep your phone number and your required pieces of personal information private.
Keeping your personal information private
By making your Facebook profile your business email, you can add an extra layer of protection to the bits of personal information you share. Here, we’ll walk you through a few steps to make your account less personal.
Make Your Facebook profile unsearchable
The first step many users take to protect their information is to make their profiles completely private. This means search engines won’t show your profile in their results, and other Facebook users won’t be able to find you with your phone number or work email. To make your profile private:
- Go to Facebook and go to Privacy Settings and Tools.
- Next, click Edit next to these sections.
- Who can see your future posts?
- Who can know your friend’s name?
- Who can find you using the email address you provided?
- Who can find you using the phone number provided?
3. Change the settings to Friends or Only Me.
4. “Do you want search engines outside of Facebook to link to your profile?” and uncheck the box if necessary.
This change only affects your Facebook profile. Your Facebook business page will still be able to search for those interested in your company.
Find the best time to publish
Storefries Best Time to Publish feature, found in Analytics, helps you find the best times to post on Facebook, Instagram, Twitter, LinkedIn, and TikTok.
These suggestions are personalized based on your past performance and the social media behavior of the audience. The best time tool for publishing offers different recommended times depending on your brand’s goals.
For example, if you’re aiming to maximize that goal, brand awareness, engagement, or website traffic, it provides a specific time frame to help you achieve that goal
After finding the best times to post, you can use Storefries easy scheduling feature to plan your content for an entire week, month, or even a year. This ensures your posts go out at the perfect times.
Storefries also offers other helpful tools like Inbox management, boosting posts, benchmarking, and more. If you want to explore all of Storefries features, you can learn more about them here.
Related blog : https://blog.storefries.com/facebook-ads-mistakes/
Facebook Business Page FAQs
Is there a difference between a Facebook Page and a Business Page?
No, they are the same! They both profile your business on Facebook.
Is a Facebook Business Page free?
Yes, it’s free to create one. You can pay for advertising or post-wurst, but creating the page itself is free.
Can I separate my Business Page from my personal account on Facebook?
Yes, they are separate. They won’t show up in each other’s profiles. You need your own account to create a Business Page, but you can update your personal information for the business if you wish.
What’s the recommended Facebook page cover photo size?
Right now, it’s 851 x 315 pixels. However, changes are subject, so check regularly for updates.






Leave A Comment